
How to Install an Electric Bike Horn (Step-by-Step)
How to install an electric bike horn usually comes down to three things: where it mounts, how it gets power, and how you route the wire so it never rubs or pinches. If you get those right, the install feels easy, even if you’re not the “bike wiring” type.
The reason this matters is simple, a horn is a safety tool, and a sloppy install can fail right when you need it. Most problems I see people run into are avoidable, loose mounts that rotate on bumps, wires that snag when turning the bars, and battery hookups that drain power or pop fuses.
This guide walks you through choosing the best mounting spot, installing either a rechargeable horn or a wired-to-battery horn, and doing a quick test checklist so you feel confident before riding.
Before You Start: Match the Horn Type to Your E-Bike
Not every electric bike horn installs the same way, so it helps to identify what you bought before you start pulling zip ties and panels.
- USB-rechargeable horn: self-contained battery inside the horn, usually the simplest install, no connection to the e-bike battery.
- Wired 12V/48V horn kit: draws power from the bike battery or a DC-DC converter, louder in many cases, but more wiring and more chances to mis-wire.
- Controller-integrated setups: some e-bikes have accessory leads or a built-in horn output, installation may be cleaner, but you need the right connector.
Key point: don’t assume voltage compatibility. Many horn kits are marketed broadly, but your bike may run 36V, 48V, or 52V, and the horn may expect 12V. If you’re unsure, check the horn label and your bike manual, and consider asking the manufacturer or a bike shop.
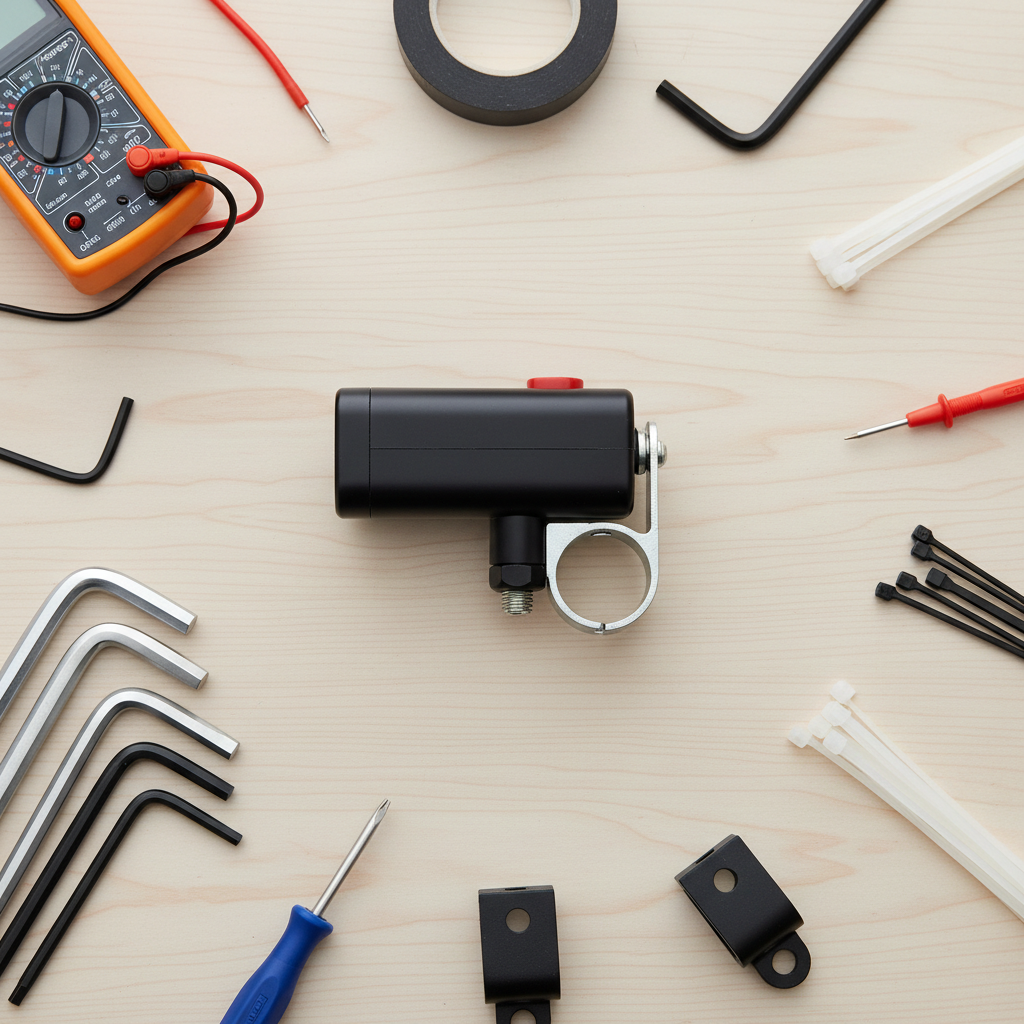
Tools, Parts, and a Quick Safety Reset
Most installs take 30–60 minutes, and you can do a lot with basic tools. The list below keeps you from stopping mid-job.
- Hex keys or screwdriver set (whatever your bike uses)
- Zip ties (a few sizes), flush cutters or scissors
- Electrical tape or heat shrink (nice to have, not always required)
- Isopropyl alcohol wipe (for adhesive mounts)
- Multimeter (recommended for wired kits)
Power safety is where people either get careful or get in trouble. Turn the bike off, remove the battery if it’s removable, and avoid working on wet surfaces. According to OSHA, de-energizing equipment before working on it is a basic electrical safety practice, and it applies here in spirit even if you’re only dealing with a bike accessory.
If you’re opening a controller box or tapping into the main battery line, that’s where the risk jumps. Many riders still DIY it, but if you feel unsure, it’s reasonable to stop and ask a professional mechanic or e-bike electrician.
Pick the Mounting Location (This Is Where Installs Go Wrong)
A horn can be loud and still be useless if the button is awkward or the horn blocks cables. Aim for a spot that stays stable, keeps wires safe, and lets your thumb reach the switch without thinking.
Common good mounting spots
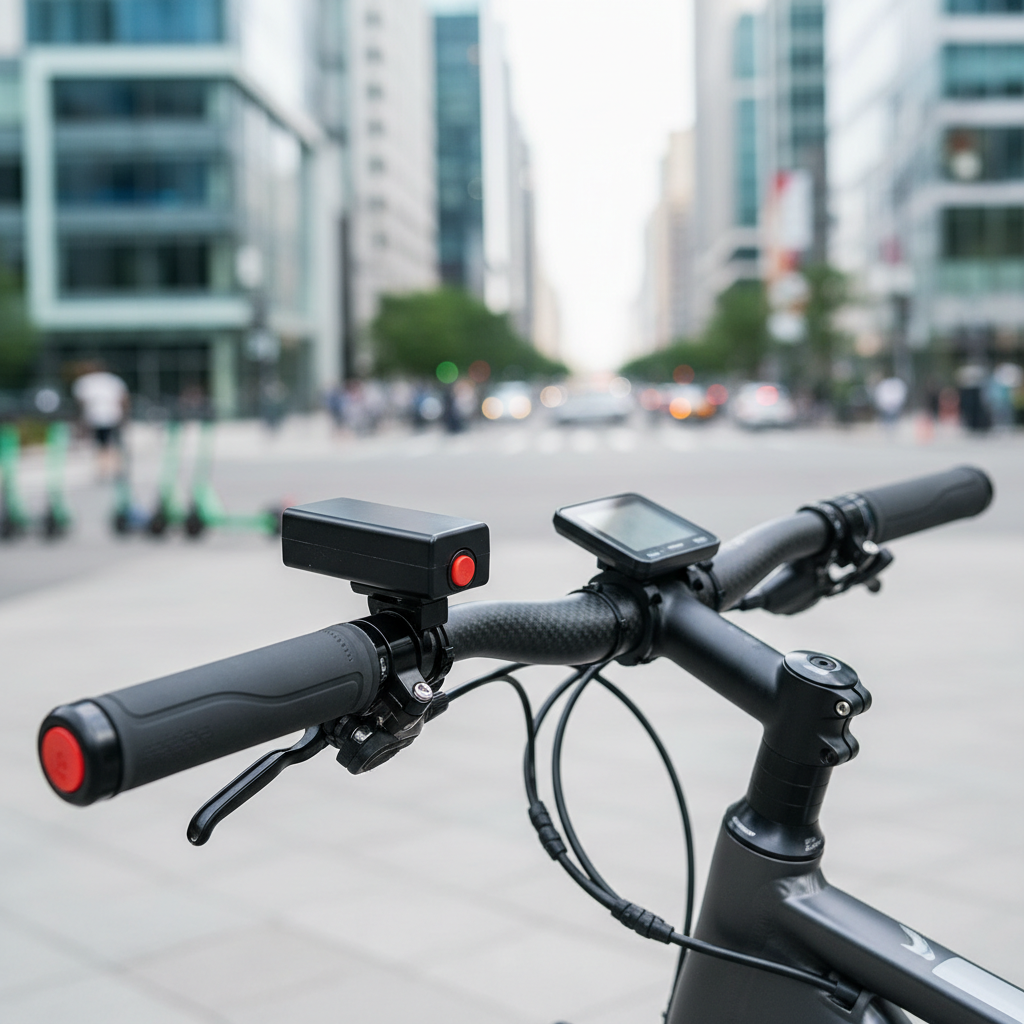
- Handlebar near the grip: best for quick access, make sure it doesn’t interfere with brake levers or shifters.
- Stem area: cleaner look, sometimes more room for the horn body, but check steering clearance.
- Fork crown / head tube: keeps bars less cluttered, but wiring must allow full steering lock.
A fast “fit check” before tightening anything
- Turn handlebars fully left and right, confirm no wire pulls tight.
- Squeeze brakes, shift gears, confirm no contact with the horn body.
- Check light mounts and phone mounts, avoid stacking clamps too tightly.
Practical tip: if your handlebar is oversized (common on some e-bikes), you may need the right shim or bracket. A clamp that “almost fits” tends to rotate over time.
Installation Steps: Rechargeable (No Bike Wiring)
If you bought a rechargeable unit, how to install an electric bike horn is mostly about clamp placement and cable tidiness. Keep it simple and make it secure.
- Clean the mount area if the kit uses an adhesive pad or if your bars are dusty, it helps prevent slipping.
- Position the horn so the sound outlet faces forward and stays clear of cables.
- Install the clamp and snug it down. Tighten gradually, alternating screws if there are two.
- Mount the remote button where your thumb naturally rests, usually inside edge of the left grip.
- Route the button wire along existing cable housing, use zip ties every few inches, and leave slack near the stem for steering.
- Charge and test before your first ride, some horns ship with low charge.
What “done” looks like: the horn doesn’t twist when you push it, the wire can’t touch the tire or fork, and you can hit the button without changing your grip.
Installation Steps: Wired Horn (Battery-Powered or Converter)
Wired horns vary, but the workflow is consistent: confirm voltage, find a safe power source, protect the circuit, and route wiring so the bike can steer freely.
Step 1: Confirm voltage and power plan
Look for a label on the horn or controller that states input voltage. If the horn expects 12V and your e-bike battery is 48V or 52V, you typically need a DC-DC converter, which steps voltage down. If your kit includes one, great, if not, pause and verify compatibility before connecting anything.
Step 2: Choose a power source
- Accessory lead (preferred when available): some e-bikes provide a 6V/12V accessory output or lighting circuit, it can be clean and switched with the display.
- Dedicated DC-DC converter to the main battery: common for louder horns, but you should fuse the line.
- Separate small battery pack: less integration, fewer risks to the main electrical system.
According to NHTSA, being visible and predictable is a big part of road safety, and audible warning devices can help in some scenarios. Still, don’t treat a horn as a replacement for cautious riding and positioning.
Step 3: Connect safely (and fuse it)
Many horn kits include an inline fuse. If yours doesn’t, adding one is a smart move. Place it close to the power source so a short anywhere down the line is protected.
- Connect positive (+) through the fuse to the horn or converter input.
- Connect negative (-) to a matching ground/negative return.
- Use proper connectors when possible, twisting bare wires and taping often turns into intermittent failures later.
Step 4: Route wires for steering and suspension movement
Leave a small service loop near the handlebar and stem so turning doesn’t tug the cable. Keep wiring away from the head tube pinch points, and don’t run it where a suspension fork compresses.
Reality check: if you need to open the controller compartment, identify unknown wires, or splice into a harness you can’t replace easily, that’s a fair moment to bring it to a shop. It’s not about skill, it’s about avoiding a costly mistake.
Quick Decision Table: What Install Path Fits Your Setup?
If you’re stuck deciding which approach to take, this table usually clears things up quickly.
| Horn setup | Best for | Install difficulty | What to watch |
|---|---|---|---|
| Rechargeable horn + wired remote | Most riders who want easy install | Low | Clamp slipping, wire snag near stem |
| 12V horn + DC-DC converter | High-volume commuting, louder alert | Medium–High | Voltage mismatch, missing fuse, messy splices |
| E-bike with accessory/horn output | Clean integration | Medium | Connector type, polarity, warranty concerns |
Testing Checklist and “Feels Right” Adjustments
After you think you’re done, do a 3-minute test. It saves you from the classic “works on the stand, fails on the street” moment.
- Sound test: press the button 10 times, listen for consistent volume.
- Steering test: turn bars full lock left and right while pressing, confirm no cutout.
- Rattle test: lift the front wheel slightly and set it down, confirm the horn doesn’t buzz or rotate.
- Cable check: verify nothing can touch the tire, rotor, or suspension.
If volume seems weak on a wired horn, the cause is often voltage drop from thin wires, poor connectors, or a converter that can’t supply enough current. A multimeter helps, but if you’re not comfortable measuring live circuits, ask a professional.
Common Mistakes (and the Fixes That Actually Work)
- Mounting on a tapered bar section: the clamp never stays tight, move it to a straight section or use the correct shim.
- Routing across the head tube: wires get pinched when turning, reroute alongside existing brake housing with slack.
- Skipping an inline fuse: small short becomes a big headache, add a fuse close to the power tap.
- Assuming all horns are street-legal everywhere: rules can vary by state and city, if you ride in traffic-heavy areas, it’s worth a quick local check.
- Over-tightening small screws: plastic mounts crack, tighten to snug, then re-check after a short ride.
And one more that’s easy to miss, if you wrap a horn wire too tightly with brake hoses, you can create annoying friction at the bars. Leave a little breathing room.
Conclusion: A Reliable Horn Is Mostly a Clean Install
If you came here for how to install an electric bike horn and you’re still unsure, focus on the basics: stable mount, safe power, and cable routing that survives full steering. Do that, and your horn becomes a dependable tool instead of another gadget that works “sometimes.”
Action steps: pick your mounting spot, do the full-lock steering check before cutting zip ties, then run the testing checklist after a short ride around the block. If wiring requires splicing into the main battery harness, a bike shop can be the cheaper option in the long run.
FAQ
Where should I mount an electric bike horn on the handlebars?
Most riders mount the horn body near the stem or just inboard of the grip, then place the button where the left thumb rests. The “right” spot is the one that doesn’t interfere with brakes and allows full steering without pulling wires.
Do I need a DC-DC converter to install a horn on a 48V e-bike?
Maybe. If the horn is rated for 12V and your bike battery is 48V, a converter is typically required. If the horn is rated for your pack voltage, you may not need one, but it’s still wise to confirm current draw and use a fuse.
How do I know if my e-bike has an accessory power lead for a horn?
Check the owner manual, wiring diagram, or the controller harness notes from the manufacturer. Some bikes provide a lighting/accessory output, but connector types vary, so you may still need an adapter.
Can installing a wired horn void my e-bike warranty?
It can, depending on the brand and what you modify. If you tap into the main harness or open sealed electrical compartments, some manufacturers may consider that a modification. When in doubt, ask the manufacturer or a dealer before wiring into the bike.
Why is my electric bike horn quieter after installation?
Common causes include a low horn battery, weak ground connection, voltage drop from thin wires, or a converter that can’t supply enough current. Start by checking connections and power source, then re-test with the bars turned both ways.
How can I keep horn wiring from getting snagged when turning?
Route the wire along existing brake/shift housing, add a small loop near the stem, and secure it with zip ties that aren’t overly tight. Do a full-lock steering test before trimming zip tie tails.
Is an electric bike horn safer than a bell?
They serve different moments. A bell is often better on shared paths, while a horn may help in louder traffic situations. Many riders carry both and choose based on context and local rules.
If you’re trying to decide between a rechargeable horn and a wired kit, or you want a cleaner, factory-like install without guessing at voltage and connectors, a local e-bike shop can usually recommend a compatible setup and route everything neatly without stressing your main battery system.