
Best bike wheel spoke protector choices come down to one thing: keeping your chain from chewing up spokes when you overshift, drop a chain, or ride with a slightly out-of-tune drivetrain.
If you ride long enough, it happens, a messy shift under load, a bumped derailleur, or a limit screw that drifted, and suddenly the chain heads toward the spokes. A spoke protector is a simple part, but picking the wrong one can mean extra noise, poor fit, or a protector that breaks the first time it matters.
This guide focuses on how spoke protectors actually work, which styles fit common U.S. bikes, and how to choose based on cassette size and riding style. You’ll also get an install checklist and a quick table to compare options without overthinking it.
What a spoke protector does (and what it can’t fix)
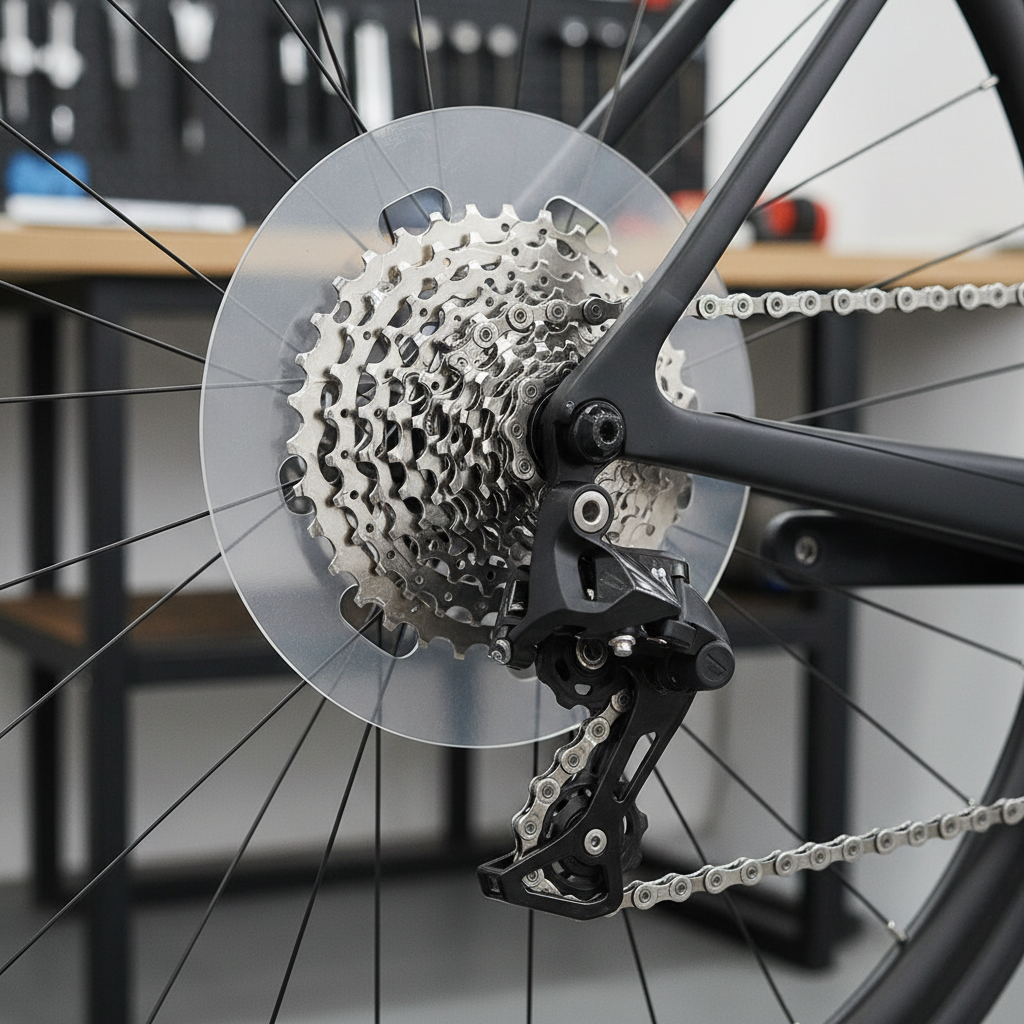
A spoke protector is a thin disc or ring mounted between the cassette and the spokes, its job is to act as a barrier if the chain goes past your largest cog.
It’s worth being blunt: it’s not a substitute for a properly adjusted derailleur. If your limit screws are wrong, hanger is bent, or cable tension drifts, the chain can still drop, the protector simply reduces the chance of spoke damage and wheel carnage.
According to Shimano, correct rear derailleur limit adjustment is essential to prevent the chain from shifting into the spokes, that’s the real root cause in most cases. Think of the protector as a seatbelt, not the steering wheel.
- Prevents: chain contacting spokes, gouging spokes, tearing nipples, wheel out-of-true after a bad shift.
- Doesn’t prevent: chain drops inboard if the drivetrain is badly misadjusted, derailleur cage damage, or noise caused by a warped disc.
Types of spoke protectors and who they’re for
There are a few common designs you’ll see in the U.S. market. The “best” option depends on cassette size, how much you care about weight and looks, and whether you’re solving an occasional problem or a recurring one.
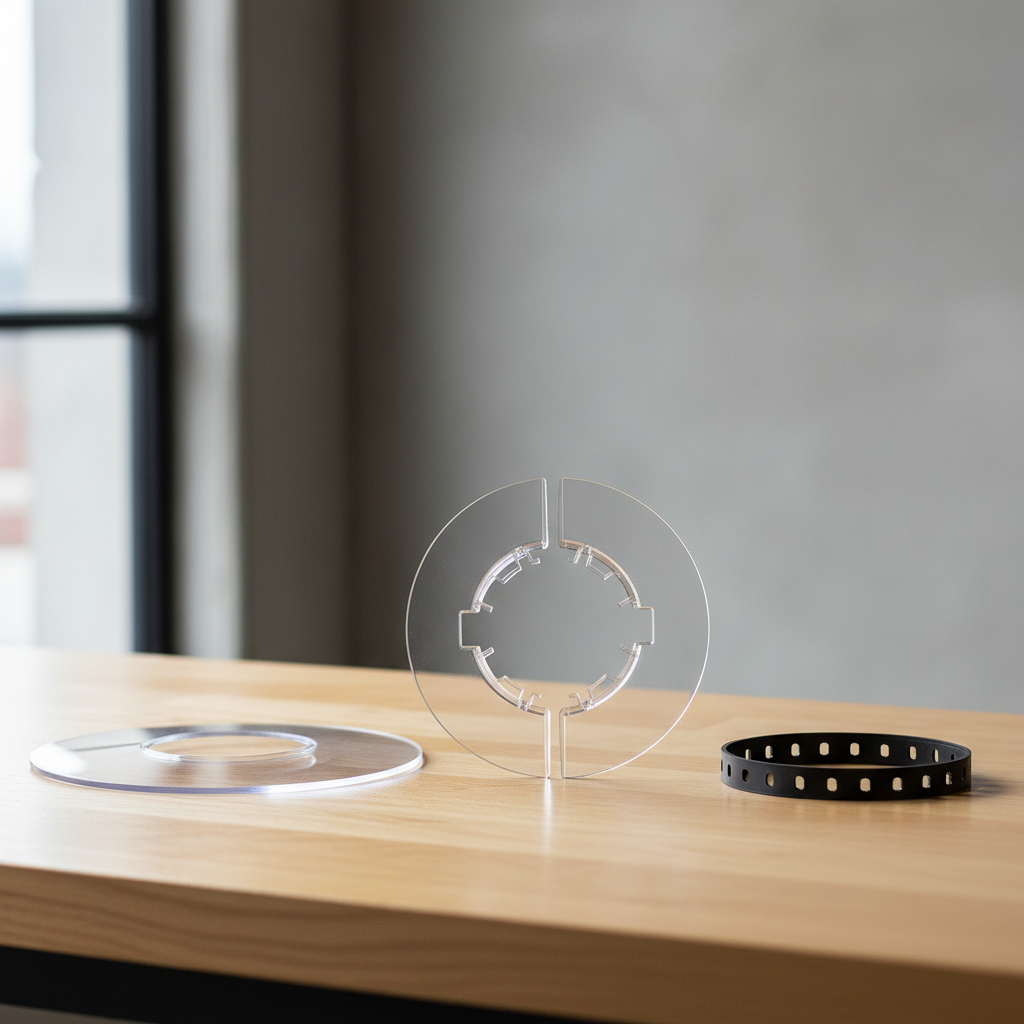
1) Full spoke protector disc (classic “dork disc”)
This is the clear or smoky plastic disc behind the cassette, common on new bikes and many hybrids. It covers a wide area, so it’s forgiving when a shift goes wrong.
- Pros: broad coverage, inexpensive, easy to find, works for many 7–12 speed setups.
- Cons: can rattle if not seated well, can warp with heat or impacts, some riders dislike the look.
2) Split disc / clip-on protector
This style snaps together around the hub area, often used as a replacement without pulling the cassette. Convenience is the main reason people buy it.
- Pros: quick install, good for home mechanics without specialty tools.
- Cons: fit varies, clips can loosen over time, coverage may be smaller than a one-piece disc.
3) Minimal ring-style guard (inner “spoke saver” ring)
Some designs focus protection close to the largest cog, aiming to stop the chain right where it crosses into spokes.
- Pros: cleaner look, less plastic near spokes, often quieter.
- Cons: less forgiving if the chain overshifts hard, not universal across hubs and cassettes.
Quick comparison table: choosing the best option for your bike
Use this as a fast filter, then confirm cassette size and mounting compatibility before you buy.
| Type | Best for | Install difficulty | Noise risk | Notes |
|---|---|---|---|---|
| Full disc (one-piece) | Most commuters, hybrids, casual MTB | Medium (often needs cassette removal) | Medium | Most universal coverage |
| Split/clip-on disc | DIY replacement without tools | Easy | Medium-High | Quality varies by brand and fit |
| Ring-style guard | Road/gravel riders who want minimal look | Medium | Low | Check clearance with biggest cog |
Self-check: do you actually need a spoke protector?
Plenty of riders buy a guard when the real fix is tuning, but there are also bikes where a protector makes practical sense. Here’s a quick reality check.
- You likely need one if you see fresh gouges on spokes, hear chain scraping near the biggest cog, or already had a chain go into spokes once.
- You probably don’t need one if your limit screws are correct, shifting is consistent, and you ride a well-maintained drivetrain with a straight hanger.
- It’s smart insurance if the bike is for a teenager, a new rider, a rental fleet, or a daily commuter that doesn’t get frequent tune-ups.
Also check your rear derailleur hanger, even a small bend can make the “big cog” shift feel fine until you hit a bump, then it jumps. According to Park Tool, hanger alignment is a common cause of poor shifting and can contribute to chain overshifts.
How to pick the best bike wheel spoke protector (fit and materials)
When people get unhappy with a spoke protector, it’s usually because of fit, not because the idea is bad. A few buying criteria prevent most problems.
Match it to your cassette size and spacing
Count speeds and look at the biggest cog. Many protectors are marketed broadly, but clearance behind a 40T+ cassette on a modern 1x drivetrain can differ from a 28T road cassette.
- 7–9 speed: older hubs and wider gaps often fit classic full discs easily.
- 10–12 speed: tighter tolerances, be picky about thickness and inner diameter.
- Wide-range MTB/gravel: consider coverage close to the biggest cog, but confirm it won’t rub under wheel flex.
Choose material based on how the bike gets used
- Polycarbonate-style plastics: typically tougher and less prone to cracking than very brittle clear plastic, but product pages don’t always specify.
- Basic clear plastic: fine for many commuters, can warp or rattle if installed poorly.
- Metal guards: less common, can be sturdy, but can transmit noise if alignment is off, and may not be worth it for most riders.
Decide whether you want cassette removal
If you already own a chain whip and cassette lockring tool, a one-piece disc is usually cleaner and more secure. If not, a split disc is tempting, just be honest about long-term durability.
Installation steps that avoid rattles and rubbing
The goal is simple: the guard sits flat, centered, and never touches the cassette or spokes in normal riding. The details vary by style, but these steps cover most installs.
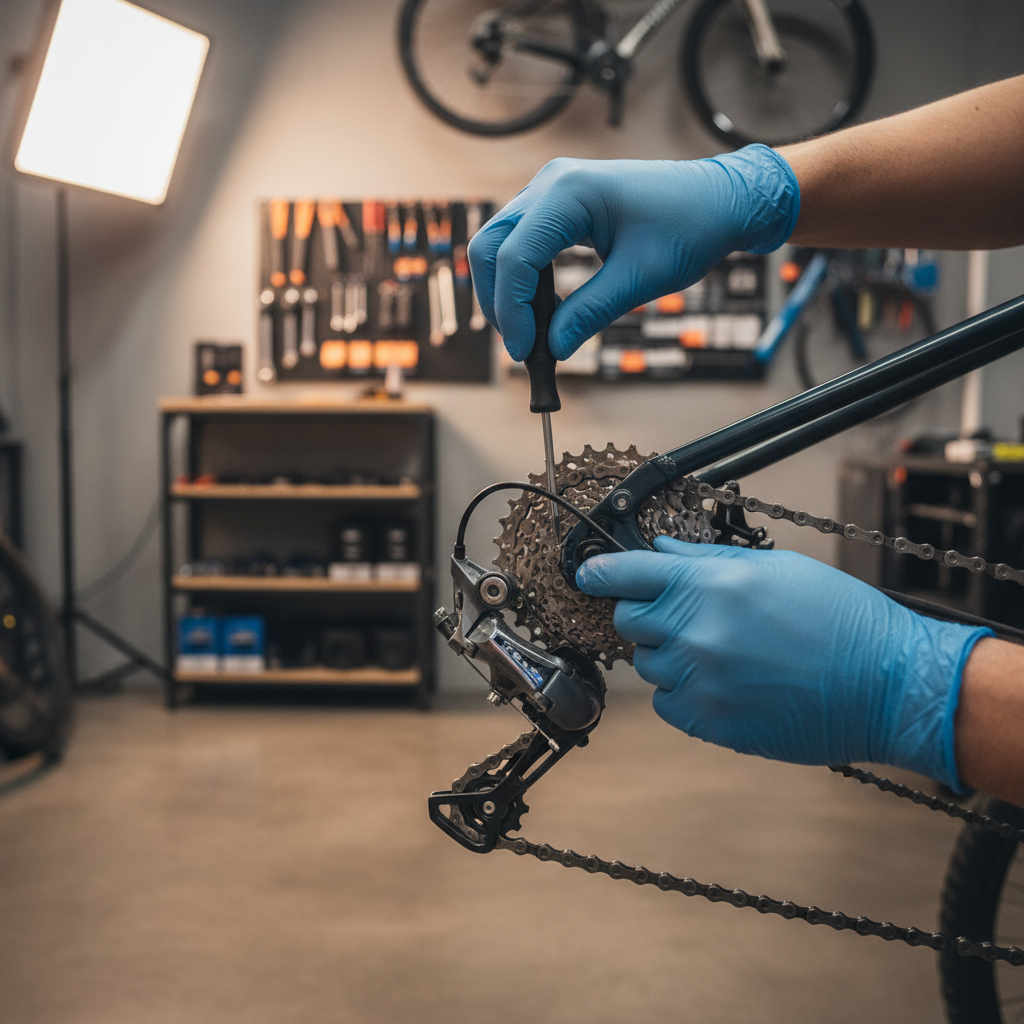
For one-piece discs (often requires cassette removal)
- Remove rear wheel, inspect spokes for existing damage, replace any deeply notched spokes before riding hard.
- Remove cassette using the correct lockring tool, many modern cassettes share common standards, but confirm yours.
- Slide the disc onto the freehub body, ensure it sits flush against the hub flange area or spacer as designed.
- Reinstall cassette, torque to manufacturer spec, then spin the wheel and watch for wobble in the disc.
For split/clip-on discs
- Clean behind the cassette area as much as possible so the clips seat evenly.
- Snap the disc around the hub area, then rotate the wheel slowly and check for high spots.
- If it rubs, re-seat the clips rather than “bending it into place”, warped discs tend to stay noisy.
Final checks (don’t skip)
- Shift into the largest rear cog while the bike is in a stand or safely supported, listen for any contact.
- Check derailleur L-limit and cable tension, the protector should be a backup, not the primary stop.
- Do a short test ride, then re-check, some clip-on discs settle after a few miles.
Common mistakes that make a good protector feel “bad”
Most complaints about the best bike wheel spoke protector not being “best” trace back to a few predictable issues.
- Using it to mask bad adjustment: if the chain regularly slams into the guard, you’re wearing out parts and risking a derailleur into spokes event.
- Wrong inner diameter: too tight means it won’t seat, too loose means it wobbles and ticks.
- Disc not running true: even slight warp can create an intermittent scrape that’s maddening on quiet roads.
- Ignoring spoke condition: once spokes are gouged, they can be a weak point, especially on higher-tension wheels.
When it’s time to get help from a bike shop
If the chain has already gone into the spokes with force, consider having a shop inspect the wheel and derailleur system. Bent spokes, a tweaked derailleur cage, or a hanger that looks “almost straight” can keep causing repeats.
It’s also reasonable to ask for help if you’re not comfortable removing a cassette, the right tools matter, and over-tightening or cross-threading a lockring can turn a simple job into an expensive one. For safety, if shifting problems persist, riding hard terrain without addressing them may increase crash risk, a mechanic can usually diagnose this quickly.
Conclusion: what “best” usually means in real life
In most everyday scenarios, the best bike wheel spoke protector is the one that fits your cassette cleanly, stays quiet, and pairs with a properly adjusted derailleur so it rarely has to do any work.
If you want maximum coverage and don’t mind a bit of visual bulk, a solid one-piece disc is a reliable default. If you’re replacing a broken guard without tools, a well-made split disc can be a practical compromise, just be picky about fit and re-check after a few rides.
Action items: inspect your spokes for fresh marks, verify L-limit adjustment, then buy a protector that matches your cassette size and install method.
FAQ
What is the best bike wheel spoke protector for a commuter bike?
Usually a full disc style works well for commuters because it offers broad coverage and doesn’t demand constant attention, especially if the bike sees rain, bumps, and infrequent tune-ups.
Do spoke protectors affect shifting performance?
When correctly installed, they typically don’t. If you hear rubbing or notice drag in the biggest cog, it’s more often a warped disc, wrong spacing, or derailleur adjustment drifting.
Can I install a spoke protector without removing the cassette?
Yes, with split or clip-on designs, that’s the main appeal. Just expect more variation in fit, and take time to ensure the clips sit evenly so the disc stays centered.
Why does my chain still hit the spoke protector?
That usually points to derailleur limit screws, a bent hanger, or cable tension issues. The protector is a backstop, if it’s being hit often, tuning becomes the priority.
Are “dork discs” required on bikes sold in the U.S.?
Some new bikes ship with them, and certain brands include them for safety and warranty reasons, but requirements can vary by bike type and retailer policy. If you remove it, make sure limits are set correctly.
What size spoke protector do I need for a 12-speed cassette?
There isn’t one universal size. Check your cassette’s largest cog and the protector’s stated compatibility, then confirm inner diameter and thickness so it clears the freehub and doesn’t rub under load.
Is a spoke protector necessary on mountain bikes?
Many riders run without one if the drivetrain is dialed and the hanger stays straight, but trail impacts can knock things out of alignment. For newer riders or bikes that get frequent knocks, it can be a sensible safeguard.
If you’re trying to choose a spoke protector and also chasing a recurring “chain to spokes” scare, it may be easier to treat this as a small system problem, pick a guard that fits your cassette, then pair it with a quick derailleur check so you stop guessing and start riding quietly again.